Autoload into Relativity Data Extract Job
Data Extract Export Jobs are created from completed
Data Extract Jobs. You can load eCapture Data Extract Job data directly into Relativity.
-
Click the Client Management tab.
-
Do one of the following:
- In Tree View, navigate to the
Data Extract Jobs folder (under Custodian). Right-click a completed
Data Extract Job to display
the context menu. Select Export Extracted Data on the context
menu to display the Specify Export Parameters dialog box. The job you selected
shows a selected check box in Tree View.
- In Tree View, navigate to Export Jobs (under Client). Right-click Data
Extract Exports to display
the context menu. Select New Data Extract Export Job from the
context menu to display the Specify Export Parameters dialog box.
-
Do one of the following:
- Choose Select Jobs and then expand the displayed Tree View. Select a Data Extract Job
for exporting. Select additional Data Extract
Jobs for export by selecting their check boxes. The Export Job Name field populates with the first
Data Extract Job you selected. The system goes through each one and stores
the data under the directory of the Export Job Name you indicated
in the Specify Export Parameters dialog box. If necessary, expand
Tree View to view all the Data Extract Jobs.
- Choose the Select Export Set option
to display a list of Export Sets that were created in QC and then select
an Export Set. If necessary, expand any Export Set Containers
to select an Export Set that is stored in a container.
-
Under Export Settings, on the Export Type drop-down menu,
select Direct to Relativity.
-
Under Export Settings, in the Export Job Name field, enter an Export Job name, If a
default name displays in the field, modify it if necessary. This is
the name the system uses for the directory name where the exported
data is stored.
-
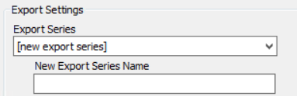
(Optional) Under Export Settings, open the Export Series drop down menu and do one of the following:
-
Leave the default setting ( [none]).
-
Select
an Export Series on the drop-down menu. See Overview: Export Series for background information about Export Series.
Or see Create an Export Seriesif
you want to create the Export Series before the Export Job is
created.
|

|
Note: When an existing Export Series is selected,
the  , appears. If you click the button, the Export settings dialog boxes will
not appear; instead the Job is placed in the Job Queue. If you do not click the Accept All Export Series Settings button, the Export settings wizard displays allowing you to set the Export settings and then run the Export Job. , appears. If you click the button, the Export settings dialog boxes will
not appear; instead the Job is placed in the Job Queue. If you do not click the Accept All Export Series Settings button, the Export settings wizard displays allowing you to set the Export settings and then run the Export Job.
|
-
Select [new export series] and enter a New Export Series
Name. This option creates an autoload-enabled export series along
with the autoload export job. After the series is created, autoload
export jobs can be created from the series.
-
(Optional) Click the Load from Template browse button, and browse to the ExportSettings.INI template file that has the settings from a previously run Data Extract Export. A file
will not exist until you run your first data extract export.
|
|
Note: This option is not available if you select an existing Export Series
on the drop-down menu. This file saves time by not requiring you to manually make selections in some of the Export wizard screens,
as well as ensuring that there is consistency when exporting jobs for
a particular situation.
|
-
Select a Task Table from the drop-down menu. The task
table that displays in the field is based on the last task table selected
for the Client.
-
Click OK. Unless  was
clicked for an existing Export Series, the Select Export Formats and File Handling
Options dialog box appears .
was
clicked for an existing Export Series, the Select Export Formats and File Handling
Options dialog box appears .
-
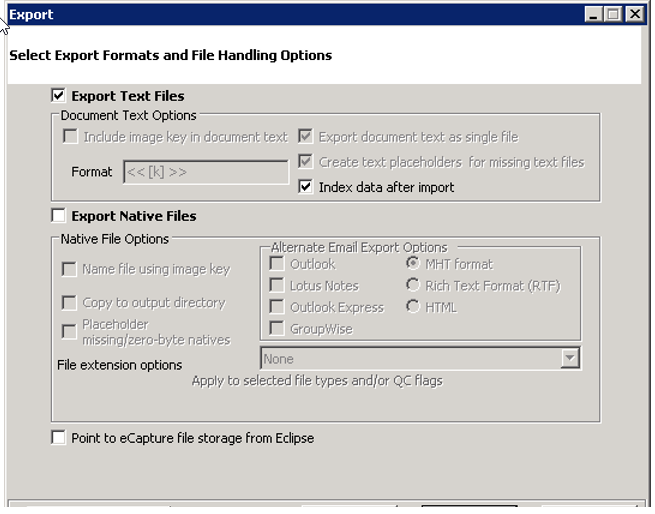
Complete the Select Export Formats and File Handling Options dialog box by selecting the required options. For more information about the various options, click the following.
 Export Formats and File Handling Options
-
Export
Text Files: Select this option to display additional data load
formats of LaserFiche, DB/Textworks, IPRO Data Review, Ringtail,
Summation DII, and OCR Control.lst.
|
|
Note: If the Export Text Files option
is unchecked, then no text files are created except for the VolumeManifest.TXT.
|
-
Include Image Key
in Document Text: This
option is not available when selecting direct to Relativity
exporting.
-
Create Text Placeholders
For Missing Text Files: Creates placeholder text files for documents in which
there was no available text. For direct to Relativity
exports, this option is automatically selected by default.
-
(Optional)Export Native Files
Under Native File Options, select from the following:
-
Name File Using
Image Key: If this option is selected, the native file directory
will no longer create an additional directory for each document.
By naming the file to include the
image key number, it removes any chance
of duplicate file names occurring. Therefore, the additional
level of directories are not necessary.
-
Placeholder
missing/zero-byte natives: When this option
is selected, placeholders are created for documents that do not contain available text. This option is
automatically selected for direct to Relativity exporting.
If the Placeholder missing/zero byte natives option is not selected
(default setting), then placeholders are not generated. For zero-byte
files, a copy of the file is generated with the same name as
the original document. Any files that are unextractable will not be generated.
Under Alternate Email Export Options, select from:
- Outlook
- Select this option to export an alternate native file for Outlook
files. The default export format is MSG.
- Lotus
Notes - Select this option to export an alternate native file for IBM
(formerly Lotus) Notes files. The default export format is DXL.
- Outlook
Express - Select this option to export an alternate native file for
Outlook Express files. The default export format is EML.
-
GroupWise
- Select this option to export an alternate native file for GroupWise
files. The default export format is XML.
Select one of the following formats:
- MHT-Native
Export: Exports selected e-mail type to a standardized
format rather than to DXL or XML. Types include Outlook,
Outlook Express, IBM (formerly Lotus) Notes, and GroupWise.
(An MHT file is an Archived Web Page file with
information in Multipurpose Internet Mail Extension HTML
(MHTML) format with an MHT file extension. All relative
links in the Web page are remapped and the embedded content
is included in the MHT file.)
- Rich
Text Format (RTF): Uses Microsoft Word to open the MHT
and saves it as an RTF; a more widely accepted format.
- HTML:
HTML documents can have inline images, the images themselves
are not included in the HTML. The images must be included
in the export in order to access the inline images.
File extension options:
This option is used if the native documents are missing or have incorrect file extensions. When this is the case, the native file viewers
will not work. The correct extension is defined as the value presented
in the Extension field of the StellentDefs table in the configuration
database for the StellentID of the file. Oracle® Outside In Technology
will not identify files it cannot discern with a TXT extension. If necessary,
a Database Administrator may manually update through SQL the Extension field in the StellentDefs table with custom extensions. The options on
the drop-down menu include:
- None
- default setting. Nothing happens.
- Add
extension only if missing
- Append
corrected extensions - appends extensions that are incorrect or
missing.
- Replace
incorrect extensions - replaces incorrect extensions with correct
extensions or missing extensions.
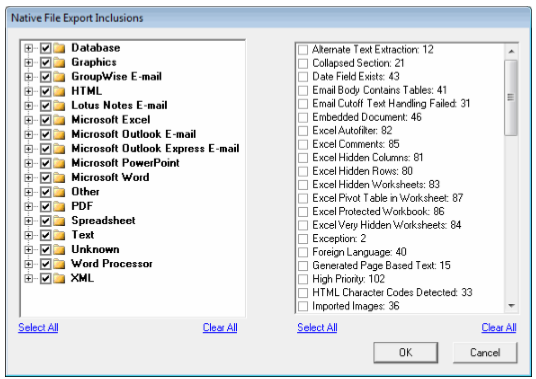
Click the link, Apply to selected file types and/or QC Flags,
to open the Native File Export Inclusions dialog box .
By default, all file
types are selected and the QC flags are not selected. For the file types,
click Clear All, to clear all the selected file types and then select
the specific file types and/or only documents to which the QC flag or
flags are attributed. If necessary, click + to expand the list for a file
type, such as Microsoft Excel, to display specific versions/types of Microsoft
Excel. If either one (file type/QC flag) "hits", the native
file will be exported.
Click OK to return
to the Export screen. A message appears underneath the link that states
the number of file types and QC flags, if any, that were included.
When finished, click  .
.
- If at least one
set of text exists in one of the Data Extract jobs or Export Sets
selected for the Export Job, the Specify Merge Data Options dialog box appears.
Click the following for information about completing this step.
Merge Data Options
Do
the following:
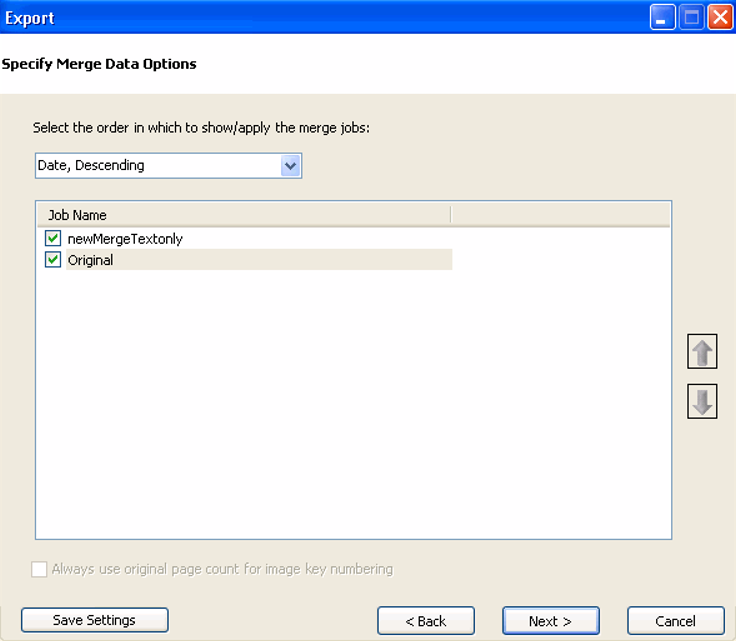
- From the drop-down menu, select
the order
in which merge jobs display in the Merge Jobs drop-down menu in the Image
tab or View tab (Date, Ascending; Date,Descending (default); Name,
Ascending; Name, Descending; Custom - use the up/down arrows).
- Clear one or more merge jobs.
By default, all merge jobs are selected. The "Original"
item refers to the original images and text associated with the
document. It displays as the last item in the list of merge jobs
and remains selected.
When finished, click .
The Export Fields
screen appears.
For information about completing this step, click the following:
Define Export Fields for Databases
If you are creating any database
load file formats during the eCapture export process,
you need to define the export fields that eCapture will
export. This step ensures that the data exported from eCapture matches the fields in the database where the data
will be used.
There are several field types that
can be exported. These field types are designated as follows:
S (System Fields): These fields
only have meaning in the context of an eCapture export.
If a document was viewed outside of the export, none of these
field types would apply. Any brackets [] will be removed from
the label when exporting.
The System field definitions are
as follows:
|
ITEM_ID
|
The eCapture unique
identifier for the document. Can be added/removed from the Selected
Fields list box.
|
|
BEGDOC
|
Starting Bates of the document.
|
|
ENDDOC
|
Ending Bates of the document.
|
|
Note: Not automatically included in the Selected Fields list box;
however, may be selected if it is to be included in the export.
|
|
|
BEGATT
|
Starting Bates of the attachment
range.
|
|
ENDATT
|
Ending Bates of the attachment
range.
|
|
PARENT_ATTACHMENT
|
"P"
for anything not an attachment, "A" for attachment
(child).
|
|
ATTACHMENT_BATES
|
Semicolon-delimited
list of Bates numbers of the children of a parent document.
|
|
ATTACHMENT_ITEMIDS
|
Semicolon-delimited
list of the ItemIDs of the children of a parent document.
|
|
DOMAIN NAMES
|
De-duplicated, semicolon- delimited list of domain names pulled from the TO, FROM, CC,
and BCC fields of an email and a message.
|
|
OCR_CONFIDENCE
|
Confidence level
of an OCRed document.
|
|
PARENT_BATES
|
If a document is a
child, the Bates of the parent.
|
|
PARENT_ITEMID
|
If a document is
a child, the ItemID of the parent.
|
|
EXPORT_NATIVE_FILES
|
Used when exporting
native files. Shows export path to the native files. Defaults
to the Selected Fields list box when Export Native Files is selected
from the Select Formats and File Handling Options dialog box. May be moved from the
Selected Fields list box to the Available Fields list box, if required.
|
|
ABSOLUTE_PARENT_ID
|
Obsolete - use
PARENT_ITEMID instead. PARENT_ITEMID queries the ExportedItems
table to get an absolutely accurate parent ID relating to
the Export. ABSOLUTE_PARENT_ID reads from the Items table.
Both should agree, but if not, PARENT_ITEMID is the more accurate
of the two.
|
|
RELATIVE_PARENT_ID
|
This field is
relative to the Discovery Job, not the Export. The All Items
in a Family options may result in the relative parent being
excluded from the export.
|
|
Note: PARENT_ITEMID can differ from
ABSOLUTE_PARENT_ID if the All Items in a Family options cause
the absolute parent to be excluded from the export. PARENT_ITEMID
is relative to the Export; ABSOLUTE_PARENT_ID is relative
to the Discovery Job.
|
|
|
RELATIVE_PATH
|
Original path to
native file without directories above where the directory
folder was selected.
|
|
SEARCH_HITS
|
Contains the search
terms.
|
|
QC
FLAGS*
|
This field contains QC flags and/or user-defined custom
flags for each document.
|
|
QC
EXCEPTION FLAGS*
|
This field value comprises both the
Exception QC flag and the Protected QC flag.
|
|
QC
HIDDEN CONTENT FLAGS*
|
Contains the following QC Flag fields
in a semicolon-delimited format:
-
Word Revisions
-
Word Comments
-
Word Hidden Text
-
Excel Hidden Rows
-
Excel Hidden Columns
-
Excel Hidden Worksheets
-
Excel Very Hidden
Worksheets
-
Excel Comments
-
PowerPoint Hidden
Slides
-
PowerPoint Speaker
Notes
-
Embedded Document
|
|
CUSTODIAN_NAME
|
The name of the Custodian containing the process job that produced the document being exported.
|
|
DISCOVERY_CUSTODIAN_NAME
|
Used to
identify the Custodian of the discovery job in which an exported
item was found.
|
|
CUSTODIANS
|
Used to identify the duplicate Custodians for this record.
|
|
DUPLICATE_LOCATIONS
|
Used to list
the (Duplicate ID), Custodian Name, <Filename>, and
[Discovery Path] for this record.
|
|
DATA_EXTRACT_JOB_NAME
|
The name
of the Data Extract Job that produced the text being exported.
|
|
RULE_CATEGORY
|
Contains the categories
(selected and assigned through the Flex Processor).
|
|
PROCESS_STATUS
|
Displays the process
status results of a job. Items that processed successfully
will show "Success".
|
|
IDENTIFIED_LANGUAGES
|
List of languages,
identified by ELS, that exist in a document.
|
|
IDENTIFIED_ENCODING
|
List of encodings,
identified by ELS, that exist in the document.
|
|
EXTRACTED_ATTACHMENT_COUNT
|
Counts
the children of a document as it relates to the export. The
count should always match up with the number of ItemIDs in
the field ATTACHMENT_ITEMIDS and image keys in the ATTACHMENT_BATES
field.
|
|
Note: This field is zero for all documents in
the Export that have a parent in the Export.
|
|
|
EXTRACTED_ATTACHMENT_NAMES
|
Generates
a semicolon-delimited list of the child document’s file names
in the order of the export. The number of file names in the
list should match the EXTRACTED_ATTACHMENT_COUNT.
|
|
VOLUME_NAME
|
The value is the label
for the document’s volume.
|
|
ORIGINAL_CUSTODIAN
|
Populates with
the name of the Custodian the original file belonged to when
an item duplicates against another file when doing de-duplication
at the Project or Client level.
|
|
BATCHID
|
Contains the Batch ID assigned
for the Discovery Job.
|
|
FULLTEXT
|
Contains combined contents
of body text and OCR text.
|
|
EXPORTED_TEXT_FILES
|
Contains the
path to the exported extracted text files. The value of this
field is affected if the Replace the export path with
the following drive letter/path field is populated (located
in last Export screen).This field cannot be used for a Group
field.
|
|
DocType
|
Contains eMail, eDoc, and eAttach types.
|
|
DocCategory
|
Contains definitions
that represent the document based on Email (absolute parent
and loose email only, e.g., not email attached to email), Email
Attachment (any email attachments to an email), Edocument
(files that are not email and not an attachment of an email
family), Edocument Attachment (any embedded file in an edocument;
including emails).
|
|
USERDEFINED1 through USERDEFINED5
|
Values to be entered by using SQL Server Manager. These fields
can be used for endorsements, custom placeholders, and so on.
|
|
*QC FLAGS,
QC EXCEPTION FLAGS, and QC HIDDEN CONTENT FLAGS display the values in a semicolon- delimited format concatenated by group. Each line of the export
will have all the applied flags for each grouping.
The
following example shows the three export fields and a user
defined flag in semicolon-delimited format concatenated by
groups. The first line is the header line and the second line
contains the field values.
"BEGDOC","QC
FLAGS","QC EXCEPTION FLAGS","QC HIDDEN
CONTENT FLAGS"
"000000001”,"Excel
Hidden Rows;Excel Very Hidden Worksheets;CustomFlag,"Exception;Protected","Excel
Hidden Rows;Excel Very Hidden Worksheets"
|
F (QC Flags): The QC flags that
display in the list are both system QC flags and any user-defined
QC flags for the selected Processing Job(s). The CUSTMDAT.TXT
file, created from the Export, will show a value of Y for
flags that are "on" or be blank for flags that are
"off".
M (metadata Fields): These fields
were retrieved from documents during processing.
|

|
Warning: Last Access Date,
Last Access Date*DATE ONLY*, and Last Access Date*TIME ONLY* are volatile
system fields. The first time that eCapture discovers
a directory of loose files, Last Access Date is valid.
However, subsequent Discovery Jobs, run on the same set of
files, get the date the eCapture last "touched"
the file on the initial Discovery Job. We highly recommend
that you not use the Last Access Date metadata fields.
Because there isn’t a legitimate value for any file eCapture
extracts, this field will be populated for loose files only.
In addition, emails that eCapture extracts, attachments,
embedded files, and files extracted from archives will not
have this value populated.
|
E (External Fields): These fields
are from Export Jobs originating from IPRO Allegro or from
the eCapture Import wizard.
U or G (User Defined Fields): These
comprise two types: User [U] and/or Group [G]. These fields
are created through the Insert Custom Fields function. The User
fields export the field label and the value you may optionally
enter. Otherwise, the value may be left blank. The Group fields
are space-delimited combinations of System (S) and/or Metadata
(M) field types.
When the Data Extract Export wizard
is initiated, the Process Jobs to be exported are selected
first. The fields available for export are based on a standard
list of metadata fields combined with the metadata retrieved
during processing.
The available fields list view is
populated using this list of metadata fields, along with the
system fields that are available for all exports. In addition
*DateOnly* and *TimeOnly* fields are parsed from date fields
and included in the Metadata fields.
The export will always export the
non-displayed system fields [BATES_NUMBER] and [ITEM_ID] as
the first two fields regardless of field selections shown.
All other fields to be exported are displayed in the Selected
Fields list box and will be exported, in order, and named as the field
label. The next section describes how to populate the Selected
Fields list box.
Sorting Fields
Right-click a field and select Make
Sort Field from the context menu. This option displays for
those fields that can be sorted, such as a metadata field.
A Y appears in the Sort column.
To clear this entry, right click the field and choose Clear
Sort Field.
When a field is marked as a Sort
field, it applies the value of the selected field to all family
members of a parent item. This allows sorting on the specified
field in an external application to represent a family. For
example, when the Sent Date field is made into
a Sort field, the value of the Sent Date field
for an email will be used as the value of the same field in
the exported load file for all of the email’s attachments.
Select
Options in the Select Export Fields Dialog Box
The
field type designator displays in the Type column of both
the Available Fields and Selected Fields list boxes.
Available
Fields: List box that displays all fields available to be exported. Click
the drop-down menu located above the field list and select
a specific field type. By default, All Fields appears. CTRL-click
to select non-contiguous fields. SHIFT-click to select a contiguous
range.
Filter value: Enter a value to filter the list. For example, to see only
those fields that contain the word date, enter
date and click
 .
To display all fields, delete the value, leave the field blank, and click
.
.
To display all fields, delete the value, leave the field blank, and click
.
Selected
Fields: List box that displays all fields selected from the Available
Fields list box for export. Right-click a field to edit it. Use
the up or down arrows to reorder the fields.
-
 : Click to move a selected field from the
Available Fields list box to the Selected Fields list box.
: Click to move a selected field from the
Available Fields list box to the Selected Fields list box.
-
 : Moves all fields from the
Available Fields list box to the Selected Fields list box.
: Moves all fields from the
Available Fields list box to the Selected Fields list box.
-
 : Click to move a selected field from the
Selected Fields list box to the Available Fields list box.
: Click to move a selected field from the
Selected Fields list box to the Available Fields list box.
-
 : Moves all fields from the the
Selected Fields list box to the Available Fields list box.
: Moves all fields from the the
Selected Fields list box to the Available Fields list box.
Field List: This drop-down menu contains the following
field list templates: IPRO Basic Field List, IPRO Standard Field List, IPRO Extended Field List, and IPRO Enterprise
Field List. The IPRO Enterprise Field List reflects the standard
list of fields that are selected by default in a new Allegro
case and created in a new Eclipse case. To make field selection easier, the templates are used to load
the fields all at once into the Selected Fields list box. The
drop-down menu also displays user-saved System templates
and/or Client templates. Templates selected from a physical INI file do not display in this list.
To load a template into the Selected
Fields list box, select the template from the drop-down menu. A
warning dialog box displays to indicate that loading fields
from a template will clear any selections, including group
fields and field label modifications. Click
Yes to continue. The template’s fields display in the Selected
Fields list box.
To save a new template based on manually
selected fields, click the drop-down menu, select Save As,
and click  . The Save
Template As dialog box appears.
. The Save
Template As dialog box appears.
Select from the following:
- System
Template - available to all Export Jobs
-
Client
Template - available only to the Client
For
System Template or Client Template, enter a meaningful name
for the template.
-
File
- saves to a physical INI file in selected location
For
a File template (.INI), click  to display
the File Browser dialog box. Browse to a location, enter a file name,
and click Open. The Save Template As dialog box displays and indicates
the path name in the Location field. Click Save.
to display
the File Browser dialog box. Browse to a location, enter a file name,
and click Open. The Save Template As dialog box displays and indicates
the path name in the Location field. Click Save.
To select an existing user-created field
list template saved as a physical INI file, click the drop-down
menu, select Browse, and click . The Open
dialog box appears. Browse to the saved template (.INI) file and
click Open. The warning dialog box displays to indicate that
loading fields from a template will clear any selections,
including group fields and field label modifications. Click
Yes to continue. See Manage Field Templates for instructions about managing saved templates.
 : Opens the Insert
Custom Field dialog box in which you can create new
group fields and new user fields.
: Opens the Insert
Custom Field dialog box in which you can create new
group fields and new user fields.
 and
and  :
Use these arrows to change the order of the fields in
the Selected Fields list box. Select a field (or contiguous
fields) and then use either arrow to reposition it (or
the selected fields) accordingly.
:
Use these arrows to change the order of the fields in
the Selected Fields list box. Select a field (or contiguous
fields) and then use either arrow to reposition it (or
the selected fields) accordingly.
Click the following for information about selecting additional Export options, if those options are required:
Select the Additional
Export Options in the Select Export Fields Dialog Box
These options may or may not be available, depending on the data load format chosen.
-
Populate Child Fields
for Parents: If this option is NOT selected, the Parent fields
for all items (PARENT_BATES, PARENT_ITEMID) are populated only
for child items.
If
this option IS selected, the Parent fields are populated for
all items. Non-child items enter their own Bates number
and ItemID.
-
Select
Include Field Names in first line of file if you want to assist
readers in understanding or verifying the file. Do not select
this option if the file is to be loaded directly into the database.
-
If
the Concordance DAT File data load format was selected, the Export
OCRTXT field for Concordance option appears. Select this option
if you want to export the OCRTXT field. Select the version that
applies from the drop-down menu.
Click
 to open the Date
Field Formatting Options dialog box.
to open the Date
Field Formatting Options dialog box.
Date
Field Formatting: If you want to change the date field to a different
format, select from the following formats:
-
YYYYMMDD
-
YYYY/MM/DD
-
MMDDYYYY
-
MM/DD/YYYY
-
DD/MM/YYYY
Otherwise,
select the option Do Not Convert Date Fields.
Time
Format: Select from:
-
12-hour
[displays time in 12 hour format, e.g. 1:04]
-
24-hour
[displays time in 24 hour format, e.g. 13:04]
-
Regional
[formats the time according to the "default" Regional
Settings of the Worker the document is being exported on.
|
|
Note: Changing the format strings by using the Customize
button of Regional Settings will have no effect; the actual
region must be changed to see any effect.
|
Resolve
Times to Second Precision: Select this option if you want to add
seconds to all metadata date fields that have time. This does
not apply to the images.
Legacy
Date Field Formatting: By default, this option is selected. Clear
this option to select from the Invalid date options and to select
fields for date format handling.
Invalid date options
Treat
date values outside of specified range as invalid dates: Select
a start date and end date range. Any dates outside of the selected
range are considered invalid dates. The start date default
is set to SQL minimum date. The end date default is set to SQL
maximum date.
Select
one of the following options:
-
Invalid
date field output value - Enter text to display if
an invalid date is encountered. This field may be left blank.
-
Invalid
date field output do not convert - Invalid dates are output
as is with no date conversion applied.
Field
Selection
The
only fields that are not present in the list are *DATE_ONLY* and
*TIME_ONLY*. The fields in the available field list comprise fields that are marked as valid for date formatting. This is
determined by the value of TRUE in the ExportAttemptDateParse
field located in the EncounteredMetatdataFieldList table.
Date
field formatting options affect only those fields in the Fields
Selected for Date Format Handling list box.
Date
field formatting options are set at the Job level.
Filter
value: Enter a value to filter the list. For example, to see
only those fields that contain the word date, enter
date and click . To display
all fields, delete the value and click .
Select
a field for date format handling by selecting the field from the
Fields Available for Date Format Handling list box and clicking
to move the single field to the Fields Selected for Date Format
Handling list box.
For
two or more fields, Ctrl-click to select non-contiguous fields
or Shift-click to select contiguous fields. After the fields are
selected, click to move them from the Fields Available for Date Format Handling list box to the Fields Selected for Date Format
Handling list box.
eCapture creates two additional fields that divide
the date and time into a Date Only field and a Time Only field.
These two additional fields are displayed in the Available
Fields list box in the Select Export Fields dialog box.
For example, if the DueDate field was moved to the Fields Selected
for Date Format Handling list box, the following additional DueDate fields
would display in the Available Fields list box: DueDate*DATE ONLY*
and DueDate*TIME ONLY*.
Click
OK to return to the Select Export Fields dialog box.
The Specify Export Directory and File Options screen appears.
This is the final screen in the Export process.
Click the following for more information about completing this step.
Specify
Export Directory and File Options
Export Directory Path
-
Export Directory Path indicates the directory
where the exported data is to be saved. Initially, this field shows
the area established during workstation setup, but you can click  to change it.
Export Volume Options
-
Volume name: Enter a name for the CD-ROM
label or volume path directory. This field initially uses a number
(e.g., 001) as the volume name. This setting is for database files.
-
Increment output directory every n files:
Select a value from the drop-down menu (or type a value) that
indicates the number of files (n) that are to be in each sub-directory.
Minimum value is 100. Zero may be entered for no image increment.
If the Data Load Format, Ringtail, was selected,
the values in this field will revert to 99, 999, and, so on, if
the Use Rollover Numbering option is selected when configuring
the image key number. As the image key number is entered, and changes
so as to leave space for a leading zero, the values in the Increment output directory every n files field changes accordingly. For example, an image key number
of 00001 sets the value to 9999, 0001 sets the value to 999, 001
sets the value to 99, etc.
-
Max Data Size: If the drive to which you are
saving the export files has limited space, from the drop-down menu select the maximum
space (640, 1200, 4300, or 9000) you want to use.
-
Include volume name in loadfile filenames:
Select this option if you want the Volume name to display in the
VolumeManifest.TXT file.
-
Directory for each native: This option replaces the Copy to output directory option formerly located in the first Export Wizard screen. This option is not available for selection if Ringtail was selected. Otherwise, when this option is selected, the Native file field under the Subdirectory Structure options is not available. If this option is not selected, you may enter a file name in the Native file field.
Subdirectory Structure Options
-
Document text: This field contains the
name of the folder in which the text files will be stored. Accept
or change the default folder name.
-
Increment in (Root or Subdirectory): Root
is the default. For Subdirectory, indicate the name of the subdirectory,
e.g., 0001. This folder increments once the Max
Data Size or the number of files specified in the Increment output directory every n files field is reached.
-
Click Preview to view the sample
of the selected Subdirectory Structure: Root or Subdirectory.
Additional Options
-
Mirror file structure: When selected, the
specified Export directory will have the same structure as the
directories from which the files were discovered. The discovered
directory pathing is "appended" to the specified Export
directory. For example, if the specified Export directory is:
Z:\EXPORT\Job001 and the discovered directory paths are: H:\FILES\DOC,
H:\FILES\PPT, and H”\FILES\XLS, then the exported directory pathing
will look like the following: Z:\EXPORT\Job001\H_\FILES\DOC, Z:\EXPORT\Job001\H_\FILES\PPT,
and Z:\EXPORT\Job001\H_\FILES\XLS. Each of these directories will
contain the images and extracted text of the respective, original
files. If this option is not selected, then only one directory
is created: Z:\EXPORT\Job001\IMG_0001; it will contain all of
the images.
-
Create load files only: When selected, no
images, text files, or native files are copied to the export
output directory. Only load files are created. The Export
performs as if all of the native files were exported
based on the Export options. The load file will reflect this.
-
Ocr LFP document text option: This option
is not applicable for Data Extract Export jobs.
-
Replace export path with the following drive
letter / path: Enter the path to replace the root path to the images
in the Export load files. For example, enter c:\images\0001\0001a\
to create the Ipro .LFP entries:
-
VN,DII001,c:\images\0001\0001a\DII001\,99
-
IM,AUG-001,D,0,@DII001;PROC0001\IMG_0011;AUG-001.TIF;2,0
-
IM,AUG-002,,0,@DII001;PROC0001\IMG_0011;AUG-002.TIF;2,0
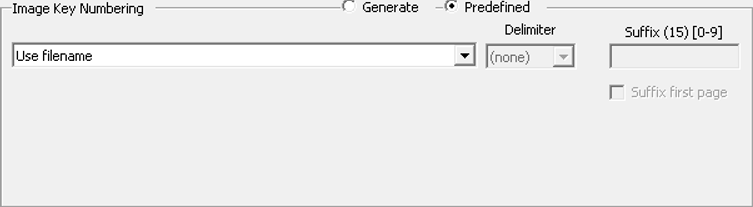
Image Key Numbering
Choose between the options Generate or Predefined:
Click the following to learn more about these options:
-
Generate
Choose Generate. The Image Key Numbering prefix segment shows {Native Filename}. The Parent and Document segments are disabled.
-
Enter a prefix in the Prefix segment
- Enter a page number in the Page segment.
- Select a delimiter on the Delimiters drop-down menu. If no delimiter is required, select (none). The Sample Image Key field is used to examine the desired image key format.
- Indicate Base Numbering to be used for Page and/or Document level numbering. One-Based is the default setting.
-
If you selected Ringtail format as an Image Load Format or Data Load Format, you have the option to Use rollover numbering. Click the following to learn more about this option.
-
Using
Rollover Numbering for Ringtail Format
When the Ringtail format is selected as an Image Load Format or Data Load Format, the Specify export directory
and file options dialog box will show the option, Use rollover
numbering. When this option is selected, the field descriptions change
to reflect Ringtail numbering characteristics. The following information and examples summarize the rollover
numbering for the Ringtail format.
As an example, assume a DocID starting number of Ipro.400000.001.0001
|
|
Note: The numbering input allows
for configuring the maximum number of images for each folder. The
usual standard is 999; however, this could be anything up
to the maximum number of pages - which in this case is 9999
- because the last segment is four digits. If the last segment
was 01, then the maximum number would be 99, and so on.
|
Enter the maximum number of required images for each directory.
Given a starting number of Ipro.400000.001.0001,
the document sequence would look like the following:
For this example, the maximum number of images for each folder
is configured at 999:
Ipro.400000.001.0001
Ipro.400000.001.0002
Ipro.400000.001.0003
…..
Ipro.400000.001.0999
|
|
Note: This was limited to 999 as indicated
previously, but it could conceivably go up to 9999 as specified.
|
Once the numbering reaches this maximum number of images for each
folder (as configured), the numbering sequence continues as
follows:
Ipro.400000.002.0001 (The second segment has now incremented
to 002.)
Ipro.400000.002.0002
Ipro.400000.002.0003
……
Ipro.400000.002.0999
……
……
……
Ipro.400000.999.0999 (Once the second segment reaches its limit,
in this case 999, the third segment is incremented.)
Ipro.400001.001.0001 (and so on. Note that the third
segment has incremented.)
……
……
Ipro.999999.999.0999 (This is the maximum theoretical number
in the sequence.)
Some additional information to take note of:
-
A document will not be split across number/directory
boundaries. For example, if numbering were up to Ipro.400000.002.0995
and the next document is a 10 page Word document, it would
start at Ipro.400000.003.0001 rather than Ipro.400000.002.0996.
The only exception to this rule would be a document that
prints to a number of pages that exceeds the directory
maximum. For example, if the maximum number of images
per directory is 999 and the situation calls for rendering
a 20,000 page document, then that would be split by necessity.
-
The directory structure will match the
number. For example, the image numbered Ipro.400000.002.0001
would reside in the \Ipro\400000\002\ directory and would
be named 0001.TIF (in the case of a TIF) or Ipro.400000.002.0001.PDF
(in the case of a PDF).
|
|
Note: When configuring the image key number, keep
in mind whether you will be exporting out a single job or using
the Export Series concept, which allows output of successive unattended
exports with sequential image key numbering and volumes. The starting
image key number will automatically be set to the next available
number based on the previous export’s ending number in the given
set.
|
-
Predefined
Predefined numbering source options are available based on previously exported data or imported/merged document keys. Select Suffix first page to allow starting the suffix on the first image key of the document rather than on the second page.
Click the drop-down menu on the left to display the available numbering options:
-
Use filename
|
|
Warning: Do not use this option for Ringtail format
because Ringtail relies on the Bates numbering scheme.
|
The Use filename option is not meant for child documents.
It is designed to reuse the file name, which should already
be in Bates number format, for numbering of LOOSE documents
only, in conjunction with usage of the Flex Processor rule
option "Create parent ItemID list" or "Create child ItemID
list". These two options created LOOSE files before export,
so that there are no documents linked to other documents through
a parent-child relationship in the Export Job. For this feature to work, ALL documents
should have a file name resembling a Bates number.
Caveats
The data that will be processed in eCapture must have
the following characteristics when using this feature:
-
Consistent Bates numbering scheme. Avoid:
-
File names that are too long
-
Duplicate Bates numbers
- Invalid characters
-
Other conditions in which the file name
does not conform to a Bates numbering scheme.
|
|
Note: An inconsistent Bates numbering scheme results in incorrect
data output.
|
-
Originally processed as a native file.
|
|
Note: eCapture extracts all email attachments
that are detected. Embedded files are extracted unless
the Discovery File Extraction option, Treat email inline
images as attachments, is deselected.
|
This option is used in conjunction with the Flex Processor
rules: Create Parent Item ID List or Child Item ID List. A rule can be created to load the
Item IDs from the native files for each individual job. If
this feature is used without the Flex Processor
rules: Create Parent Item ID List or Child Item ID List, the
result will be incorrect data output.
-
Import/Merged: Import/Merged: The Export Job uses the imported/merged linking key as the image key for Data Extract exports.
-
Enterprise: The Export Job uses the Enterprise linking key as the image key for data extract exports.
Encoding Options
Select an encoding option on the drop-down menu. Options include:
- Unicode UTF-16 - load files and extracted text are saved in this format if Force ANSI is not selected.
- Unicode UTF-8 - same as UTF-16 output except for the encoding applied to output files.
- Force ANSI - Select this option and select a character from the ANSI replacement character drop-down menu. This replaces non-ANSI characters with the selected ANSI character in the loadfile/extracted text. This allows for data loaded into applications that are not Unicode compliant.
(Optional) Click Expedite Job if you want the job to be pushed to the front of the queue.
(Optional) Click  to save the export settings to an .INI file. . For more information, see Save Export Settings.
If this is for a Data Extract Export Job, it will display in the eCapture Controller Job Queue. Start the Data Extract Export Job. The Job details are available by selecting the Job in the Client Management Tree View under Export Jobs, Data Extract Exports. The Status and Summary pane contains three buttons:
- View Settings: Click to display information about the job.
- View Output: Click to access the files that were created through the Explorer.
- ViewReport: Click to view the Export Summary Report.
If this is for an Export Series, the Series name displays in the Client Management Tree View under Export Jobs, Data Extract Exports. The Export Series is then available to be selected when creating a Data Extract Export Job.
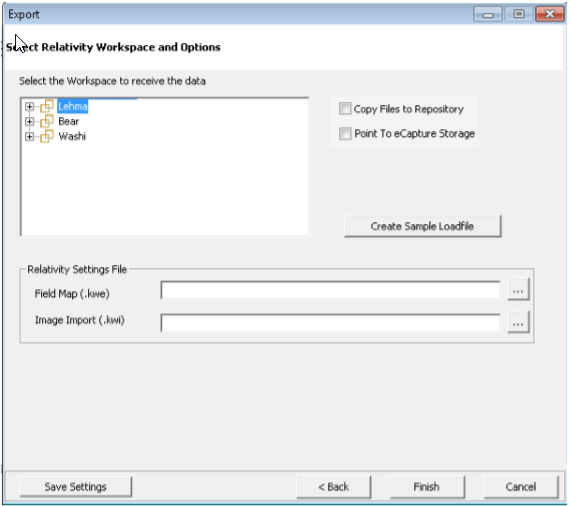
Click to display the Relativity Workspace Options dialog box.
Click the following for more information about completing this step.
Relativity Workspace Options
Expand the workspace categories and select the workspace to receive the data. Select from the following options:
Copy Files to Repository - Copies exported native, text and/or image output to the repository defined for the selected Relativity case. •
Point to eCapture Storage - Points to the native, image, and/or text output that exists in eCapture system directories (referenced in the load file) rather than placing copies of these files in the designated export output directory, resulting in saved space on the file server. If this option is not selected, the native files are copied to the export output directory and the load files reference those paths.
(Optional) Click  to open Select Directory for Sample Load Files dialog box. This option is available for both Export Job and Export Series.
Select a directory in which the Sample Load Files will be created.
|
|
Note: If the directory is not empty, a prompt displays and asks you to overwrite files. Click Yes to overwrite the files in that directory or click No to return to the dialog box where you may create a new directory or select a different empty directory.
|
Click OK. The directory is accessed and displays the sample files (CONCORD.DAT and OPTICON.OPT).
The .DAT file output contains one line with column headers as shown in the following:

Under Relativity Settings File, click  for:
for:
Field Map (.KWE) - browse to the .KWE file and click Open.
Image Import (.KWI) - browse to the .KWI file and click Open.
- If this is for a Process Export Job, it displays in the eCapture Controller Job Queue. Start the Process Export Job. The Job details are available by selecting the Job in Tree View. (Under Export Jobs, Process Exports). The Status and Summary pane has three buttons: View Settings, View Output, and View Report. Click View Settings to display information about the Job. Click View Output to access the files that were created through the Explorer. Click View Report to view the Export Summary Report.
- If this is for an Export Series, the Series name displays in the Client Management Tree View under Process Exports; located under Export Jobs. The Export Series will then be available to be selected when creating a Process Export Job.
Click  to conclude the
autoloading into Relativity. The Job displays in the Job Queue, and
the Progress column shows Autoload Initiate. In the Client Management Tree View, the Job also displays with the Relativity icon
under Data Extract Exports.
to conclude the
autoloading into Relativity. The Job displays in the Job Queue, and
the Progress column shows Autoload Initiate. In the Client Management Tree View, the Job also displays with the Relativity icon
under Data Extract Exports.
Related Topics
Overview: Export Series
Create an Export Series
Autoload into Relativity Processing Job
Ipro Tech LFP Files